Trailer Inspection PDF Template

Trailer Inspection PDF Template

The Trailer Inspection form is a critical document used to assess the safety and condition of trailers before and after use. This form collects essential details such as the location, company information, and specific equipment inspections to ensure proper maintenance and compliance. Completing this form accurately helps prevent accidents and maintain the integrity of transportation operations, so be sure to fill it out by clicking the button below.

Overview

The Trailer Inspection form plays a crucial role in ensuring the safety and efficiency of transporting goods. This comprehensive document captures essential information about the trailer, including its location for drop-off or pickup, the company involved, and relevant contact details. It outlines critical inspection criteria such as the trailer type, associated equipment, and vital identification numbers, including the truck and trailer numbers. As inspectors assess the condition of the trailer, they utilize a standardized damage identification system that includes notations for various issues, such as patches, bends, cuts, and missing components. Additionally, the form features sections to record tire conditions, comments, and the chronological details surrounding the inspection process. Drivers must also sign off on the document, promoting accountability and traceability. Complementing these assessments, the form includes a thorough inventory of necessary chains, binders, straps, tarps, and lighting equipment, ensuring every safety aspect is documented. Ultimately, the Trailer Inspection form not only enhances operational safety but also streamlines logistics for all parties involved.

Trailer Inspection Preview

Trailer Inspection

Location:

Drop

Pickup

Company:

Address:

City/St/Zip:

Date:

Contact:

Truck No:

Trailer No:

Trailer Type:

Equipment:

Flat

Van

Step

Double Drop

Phone:

Secured:

Yes

No

USE THESE SYMBOLS FOR DAMAGE IDENTIFICATION P=Patch B=Bent C=Cut M=Missing BR=Broken H=Hole S=Scrape

TOPBOTTOM

RIGHT SIDE

LEFT SIDE

FRONT REAR

DOOR OPEN

Tires:

Comments:

Date In/Out:


Time:


Driver Name:

Signature:

CHAINS & BINDERS

Count:


Chain 5/16" 20'


Binder, Ratchet 5/16"


Binder, Breakover (Snap) 5/16"


STRAPS


Strap, Ratchet - Logistic 2"


Strap, Ratchet 2"

30'


Strap, Ratchet 4"

30'


Strap, Tarp (Bungee)

TARPS

Tarp 16' x 24' Steel

Tarp 24' x 27' Lumber

RACKS

Rack, Plain Headache

Rack, 3 Door Headache

Rack, Mount

Rack, Coil

LIGHTING

Light, Bar

Light, Beacon

Light, Load

Light, Bracket

MISCELLANEOUS

Pad, Mat

Bar, Cheater

Flag, Red

Sign, Oversize Load

Vise Grip, Light Bar

Protector, Edge

File Properties

Fact Name Details
Purpose of Form The Trailer Inspection form is used to assess the condition and safety of the trailer before it is loaded or used on the road.
Location of Inspection The form requires the specific location where the trailer inspection takes place, ensuring a record of the inspection site.
Contact Information Drivers must provide their contact details alongside the truck and trailer numbers to facilitate communication and record-keeping.
Damage Identification Key A damage identification key is included on the form to categorize issues using symbols for clarity during inspections.
State Compliance In many states, trailer inspections are governed by specific regulations; for example, Texas requires compliance under the Transportation Code, Section 548.

Instructions on Utilizing Trailer Inspection

Completing the Trailer Inspection form is essential for ensuring that all necessary details are accurately documented. Following the correct procedure will help streamline the inspection process and maintain consistent records. Here’s how to fill out the form step by step.

  1. Begin by filling out the Trailer Inspection Location. Write where the inspection takes place.
  2. Next, enter the Drop Pickup Company name.
  3. Provide the Address of the company.
  4. Indicate the City/St/Zip for the location.
  5. Document the current Date.
  6. Fill in the Contact person’s name.
  7. Note the Truck No associated with the trailer.
  8. Record the Trailer No.
  9. Specify the Trailer Type.
  10. List the Equipment associated with the trailer, referencing the type and count.
  11. Indicate if the trailer is Secured: Yes or No.
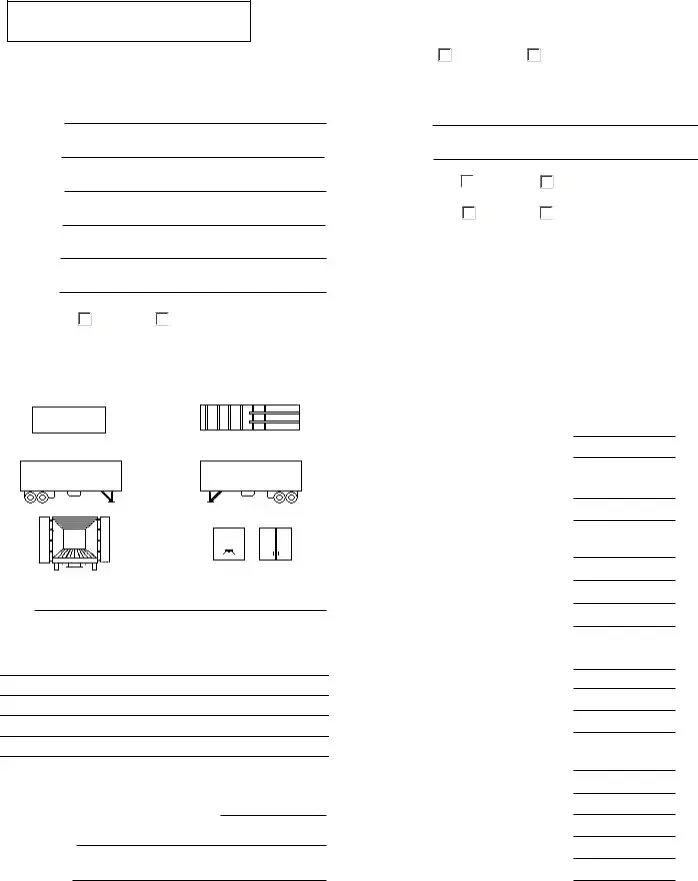
  12. Utilize the provided symbols to indicate any damage found during the inspection:
    • P = Patch
    • B = Bent
    • C = Cut
    • M = Missing
    • BR = Broken
    • H = Hole
    • S = Scrape
  13. Identify the damage on the drawing of the trailer’s anatomy, placing symbols near the respective locations: TOP, BOTTOM, RIGHT SIDE, LEFT SIDE, FRONT, REAR, DOOR OPEN.
  14. Check the Tires and add any comments as needed.
  15. Input the Date In/Out of the trailer.
  16. Record the Time of the inspection.
  17. Document the Driver Name.
  18. Finally, ensure the Signature field is signed appropriately.
  19. Count and fill in the quantity for CHAINS & BINDERS, STRAPS, TARPS, RACKS, LIGHTING, and MISCELLANEOUS items as required.

Important Facts about Trailer Inspection

What information is required to complete the Trailer Inspection form?

The Trailer Inspection form requires several key details for proper documentation. You need to provide the inspection location, pickup company, and its address including city, state, and zip code. Also, the date of inspection, contact information, truck number, trailer number, and trailer type are necessary. Lastly, documentation of the equipment being inspected and the driver’s name and signature must be included for verification purposes.

What is the purpose of the damage identification symbols?

The damage identification symbols are used to provide a quick and clear way to report any issues encountered during the inspection. Each symbol represents a specific type of damage, such as patches, bends, cuts, or missing parts. By using symbols like P for Patch and B for Bent, inspectors can efficiently communicate the condition of the trailer without lengthy explanations, making it easier for anyone reviewing the report to understand the issues at a glance.

How do I document tire condition on the form?

To document tire condition on the form, you can note the status of each tire after inspection. It is important to mention any visible issues such as wear, flatness, or damage. If you find any problems, be specific about the type of damage. This information is crucial for ensuring safety and compliance with regulations. Feel free to add additional comments for any concerns that might arise regarding tire condition.

What do I do if I find damage during the inspection?

If damage is found during the inspection, it should be clearly marked using the appropriate symbols outlined in the form. After identifying the damage, record any relevant comments that provide more detail about the condition. Ensure that the inspection report is signed by the driver, which confirms their awareness of the findings. This documentation can help in taking the necessary steps for repairs or further evaluation.

Common mistakes

Filling out the Trailer Inspection form may seem straightforward, but many people make common mistakes that can lead to delays or confusion. One frequent error is failing to provide complete information. Incomplete entries can complicate the inspection process. Every section, from the location to the driver's name, should be filled out thoroughly. This ensures that inspectors have all the details they need to review the trailer properly.

Another mistake often seen is the use of improper symbols for damage identification. Each symbol (like P for Patch or B for Bent) is there for a reason. If someone chooses not to use these symbols correctly, it can lead to misunderstandings about the condition of the trailer. Inspectors depend on these symbols to quickly gauge the state of the trailer. If the symbols are missing or misused, it could result in overlooking significant issues.

Sometimes, people overlook the importance of the datetime fields on the form. It's not enough to indicate the date or the time of the inspection; both must be recorded clearly. Leaving any of these fields blank can lead to challenges in tracking and referencing inspections later. Accurate record-keeping is crucial for safety and compliance, so it should never be neglected.

Lastly, some individuals forget to secure their trailer or correctly mark its status. In the section that asks if the trailer is secured, selecting "Yes" or "No" is essential. If this is missed, there could be miscommunication about whether the trailer is ready for transportation. Properly utilized forms help ensure safety and efficiency for everyone involved in the process.

Documents used along the form

The Trailer Inspection form is an essential document for ensuring the safe operation of trailers. However, it is often accompanied by a variety of other forms and documents that help provide a comprehensive understanding of the trailer's condition, regulatory compliance, and maintenance history. Below is a list of ten documents that are frequently used alongside the Trailer Inspection form.

  • Maintenance Log: This document records all maintenance activities performed on the trailer. It includes dates, services provided, and any parts replaced.
  • Pre-Trip Inspection Form: Used by drivers to check the condition of the trailer before departing on a journey, this form lists items such as lights, brakes, and tires.
  • Accident Report Form: In the event of an accident involving the trailer, this form captures details such as the date, location, and circumstances of the incident.
  • Load Securement Checklist: This checklist ensures that cargo is secured according to regulations, aiming to prevent shifting or falling during transport.
  • Registration Document: This document verifies the trailer’s registration with the relevant state authority and includes information such as the trailer's VIN and owner details.
  • Bill of Lading: A shipping document that provides specific details about the cargo being transported. It serves as a receipt and outlines terms between the shipper and carrier.
  • Tire Inspection Report: Focused specifically on the trailer's tires, this report assesses conditions such as tread depth and air pressure, which are important for safe operation.
  • Insurance Policy Document: Proof of insurance coverage for the trailer. It outlines the limits of coverage and conditions under which the policy applies.
  • Weight Ticket: This document shows the weight of the trailer when loaded. It is essential for ensuring compliance with weight limits on highways.
  • Equipment Manual: A guide that provides detailed instructions on the operation and maintenance of trailer equipment, ensuring that users understand how to use various components effectively.

These documents collectively enhance the safe operation and regulatory compliance of trailers. They ensure that all necessary information is available to drivers and operators, fostering a culture of safety and responsibility on the road.

Similar forms

  • Vehicle Inspection Form: Like the Trailer Inspection form, this document assesses the condition and safety of vehicles before use. It includes sections for identifying potential damage, tire conditions, and equipment specifications, ensuring all vehicles meet regulatory standards.
  • Equipment Maintenance Checklist: This checklist reviews the operational readiness and maintenance status of various equipment. Similar to the Trailer Inspection form, it involves detailed examinations of parts and functionality, ensuring all necessary equipment is in proper working order.
  • Load Securement Inspection Report: This report documents the securement of loads on trailers. It shares a similar structure, focusing on identifying potential hazards and ensuring compliance with safety regulations through observations of securement techniques and equipment checks.
  • Pre-Trip Inspection Form: This form is used by drivers to inspect vehicles prior to departing on trips. It mirrors the Trailer Inspection form by documenting crucial details about vehicle condition, driver information, and signatures, promoting safety and accountability.
  • Asset Condition Report: This report evaluates the state of assets, including trailers and other transport equipment. Like the Trailer Inspection form, it highlights specific features and damages, often incorporating visual damage symbols to streamline communication regarding asset status.
  • Safety Compliance Checklist: This checklist verifies adherence to safety regulations across transportation operations. It is similar in its systematic approach to inspecting various components and provides a framework for ensuring safety compliance throughout the organization.

Dos and Don'ts

When completing a Trailer Inspection form, consider the following best practices and common pitfalls to avoid:

  • Do ensure all sections of the form are filled out completely. Missing information can lead to misunderstandings later.
  • Don't rush through the form. Taking your time helps in accurately capturing details that may affect safety.
  • Do use clear and legible handwriting or type the information if possible. Clarity reduces the chance of errors.
  • Don't ignore the damage identification symbols. Using them correctly is crucial for conveying the trailer's condition.

Misconceptions

Misconceptions about the Trailer Inspection form can lead to confusion and errors. Here are four common misunderstandings:

  1. All damage type identifications are clearly defined.

    While the form uses symbols like P (Patch) and M (Missing) for damage identification, not everyone may be familiar with these abbreviations. This can cause miscommunication about the actual condition of the trailer.

  2. A completed form guarantees that the trailer is safe.

    Filling out the Trailer Inspection form does not ensure that the trailer is mechanically sound. The form is a tool for inspection, but thorough checks must be conducted.

  3. Only the driver should complete the inspection.

    It is critical that all team members are encouraged to participate in the inspection process. Collaboration can help spot issues that an individual might overlook.

  4. The form is only for reporting damages.

    In addition to noting damages, the form also captures vital information like the date, time, and contact details. This helps maintain an accurate record for future inspections and accountability.

Key takeaways

When using the Trailer Inspection form, keep these key takeaways in mind:

  • Complete all sections: Fill out every part of the form, including the trailer type, identification numbers, and contact details. This ensures accurate record-keeping and accountability.
  • Use damage identification symbols: Clearly mark any damage using the designated symbols (P, B, C, M, BR, H, S). This will streamline communication about the trailer's condition.
  • Document tires and equipment: Pay special attention to noting tire conditions and any equipment present. These details can impact safety and compliance.
  • Sign and date: Ensure that the driver’s name and signature are included, along with the date and time of the inspection. This documentation protects everyone involved in the transaction.

Other PDF Templates